
In this article, we will talk about how to join Airbnb as host.

Step 1. Create An Airbnb Account
To list your place, select the tab that best describes the accommodation you will be offering.
For this tutorial, we’ll be choosing Condominium, Entire Home/Apartment, and Accommodates four. Enter the City your home is located.
Click Continue.

Sign up using your Facebook account, Gmail, or e-mail account.
If you use your Facebook or Gmail account, it will retrieve the existing saved information that is already available. If you sign up via e-mail, you must manually input the information such as your full name, birthday, and password.
Accept the terms and conditions and your account is created.
Step 2. Specify The Specific Place You Are Listing
They do not limit you to condominiums or houses. You can rent out any accommodation – a bungalow, villa, treehouse, RV or even a boat! Select the drop-down to view all the accommodations possible to enlist.

Step 3. The Sleeping Arrangements
You have already specified the number of guests that you can accept. Now is the time to be specific about where they will sleep.
How many bedrooms are there? How many beds are available? Where are the beds located? Is it a queen bed? A sofa bed? Which bed is located where?
It is essential to specify these in your listing to help your guests’ expectations be in line with what your listing has.

After clicking on the “Next” tab, specify the number of bathrooms you have.
Step 4. Pin Your Location
People who successfully booked your place will need to get the exact location of your listing.
While it is good that you have pinned the exact location, don’t worry so much about being very specific. You can send your complete address to confirmed guests via the messenger inside the Airbnb platform.

Step 5. The Amenities
Tick on the amenities that your home offers. Be very honest about what you plan to offer. Once you select them, make sure they are available when your guest arrives.
It is ideal to have all the amenities suggested, BUT the basics would do when you are just starting out.

–>Here Are Guides On How To Furnish Your Airbnb Home Initially<–
Step 6. Specify The Spaces That The Guest Can Use
Privacy is not a problem when you are renting out the whole place. But when your rental space is a “shared space” such as a bedroom in a house where you also live, it’s good to tell your guest if they can use your kitchen or washer.
Check the boxes accordingly.

Step 7. Setting The Scene
Photos.
The first things that potential guests will see when they search for accommodations are your photos (the main picture to be exact). Make sure you have a stunning one.
–>Learn How To Prepare Your Home For A Photography Session<–
Unless you already have the space fully furnished and photographed, you may want to delay uploading photos until you get hold of nicely captured ones – from a professional photographer if possible.
The Listing Title.
The title of your listing will be the next thing that your potential guest will see when they search for homes. You’ll have a few seconds to capture their attention. Make sure you have the main-selling points of your home clearly stated in your title so viewers will click on it to learn more.
–>Learn How To Write Captivating Titles For Your Airbnb Home<–
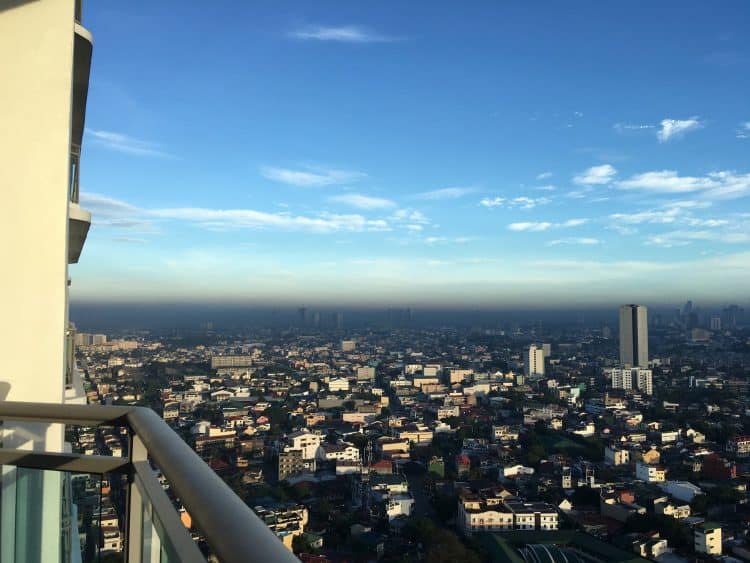
The Summary Of Your Home.
You have 500 words to highlight what is in your listing that makes it irresistible. In my case, the main selling point of our home is the breath-taking city view, whether it’s nighttime or daytime.
On the first paragraph of my listing, I am mainly attracting people who would like to relax – since I believe the view from our balcony is relaxing.
See what I mean. 🙂
The next few highlights of our home are its proximity to central business district areas, free use of pool and gym and a high-speed fibre internet connection.
You need not waste words describing how cozy your apartment is. The photos will do the taking – if not, you can specify other details of your home in the “Add More” section.
Step 8. About You
Upload Your Photo.
After filling out the details of your home, it’s time to show your guest who will host their trip. A good rule of thumb for uploading your photo is to choose a bright and friendly looking shot that you have. You wouldn’t book a house if the picture of the host looks like a psycho, right? 🙂
Input Your Mobile Number.
Make sure you input your current number. You can get notifications via text messages when people are inquiring about your place or if someone has booked your home. Your guest will also have access to your number once their booking is confirmed so they can contact you via phone too should there be emergency situations during their stay.
A verification code will be sent to your phone for you to verify that your number is active.
Congratulations! You now have an Airbnb hosting account. 🙂
If you have questions, please leave them in the comments section below, and I’d love to help you in any way that I can.:)
Cheers!

Hi Pitin
I’m going to the page of “Do you want to connect another calendar with your Airbnb calendar?
– Sync your Airbnb calendar to prevent different guests from booking the same dates. YES or NO?
Please note that our hotel’s room rate and availbility will go through siteminder system, so please kindly advise how to do.
Many thanks,
Kathy
Hi Kathy,
Are you using other sites such as Booking.com or Agoda to enlist the same place? If yes, then you need to sync the calendars to avoid double-booking. Just click the YES to answer the sync question.
I am honestly not using the siteminder system since I only have one listing, and I am only actively using the Airbnb platform.
Kind Regards,
Pitin
Hi Pitin
I have input some property details and saved and exit yesterday. Now, I would like to continue to input property details. Would you mind telling me how to continue the updating?
Many thanks,
Kathy
Hi Kathy,
From the airbnb.com homepage (you must be logged on), go to “Host” then “Listing.” You should be able to edit other details from the tabs. Just scroll down or choose a new tab to edit.
I hope this helps!
Kind Regards,
Pitin
Hi Pitin
Thanks for your reply. We used siteminder for the booking system. May I know the joining procedure? Commission? Payment method?
Many thanks,
Kathy
Hi Kathy,
To join Airbnb, you can follow the procedure I enumerated here, except that you have to choose “Private Room” since it just a room.
Airbnb will collect the payment from guests. 24 hours after your guests check-in, you will receive an email containing the amount and the date you can expect the fund to arrive in your account. It usually takes 24 to 48 hours in my case (holidays and weekends not included). You will have to add a “Payout method” in your account (ideally, your local bank account so it’s free of charges and no exchange rates’ fluctuation involved).
Once you are done enlisting (publishing) one room, there is an option to “duplicate” that listing. You can just edit the pictures, if the rooms look different from one another. Otherwise, just duplicate the listings according to the number of rooms you wish to enlist.
There is no cost to join Airbnb. However, once you get a booking, Airbnb takes 3% per reservation. That is already low enough if you compare to other platforms. I believe it’s a decent amount for an “insurance” since Airbnb can help you pay up for any troubles that can happen during reservations.
With proper proof and documentation, Airbnb has a host guarantee (property damage protection) of up to $USD 1M for every listing you have.
I hope this helps.
Kind Regards,
Pitin
This is Kathy Chan from IW Hotel, is it possible for our hotel to join Airbnb as host?
Thanks and Regards,
Kathy
Hi Kathy,
Yes, it is. If you are enlisting your rooms/properties to other platforms as well (not just Airbnb), make sure your calendar is up to date to avoid double-bookings (and therefore canceling on booked guests). There are softwares you can use for seamless integrations of platforms.
Kind Regards,
Pitin